Project Closeout Process (CLO3 Wayfinder)
This document assumes that you have an e-Builder account, have logged in, and are a participant of the project that you want to submit the Closeout Process.
The Project Closeout Rev 3 (CLO3) process facilitates the project closeout by ensuring all project stakeholders are notified, final costs are reconciled, commitments have been closed, required documentation has been received, consultant/contractor evaluations have been completed and any unused funds are returned to the funding source. The Project Manager or Assistant Project Manager will initiate this process.
Login to e-Builder and select the project you want to submit the Project Closeout Rev 3 (CLO3) process.
On the left hand side, select Processes.
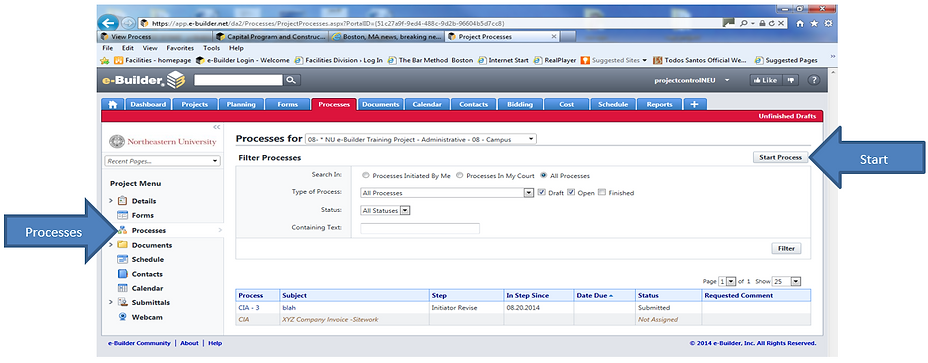
Select "Start Process" on the top right hand side of the screen.
This will launch the Process options screen. Select 08 Project Closeout Rev 3 (CLO3) Process.

This will launch the Project Closeout Process screen.

Note: All * fields are required. If no data is entered, you will get an error message.
In the Details tab enter:
*Subject: Project Closeout – “Project Name” – Date.
PM Comments: Enter any comments relevant to the Project Closeout now, these can also be added later in the process.
*Reason Code: Select a reason for the closeout from the drop down menu.
*Date of Change: Enter date of change; auto-populates the date process is initiated.
**PLEASE NOTE THAT IN ORDER TO DO A BUDGET RECONCILIATION WITHIN THIS PROCESS, YOU MUST CLICK ON “ADD ALL LINE ITEMS” TO PULL IN THE PROJECT BUDGET TO THIS PROCESS. THE BUDGET RECONCILIATION CAN BE WORKED ON THE NEXT STEP, BUT MUST BE PULLED IN THIS STEP!
Click the "Submit" button to submit the process.
When you click submit, the process will send out the “45 Day Final Billing Notification” to all Project Participants in the Vendor, Subconsultant, Consultant, Prime A/E, GC/CM, and all Northeastern University vendor roles.
The Notification is an automatic mail merge template that gets emailed out to the above roles once the submit button is clicked. A copy of the language in the template is on the next page. The sections in code are populated from e-Builder based on each individual project and saved in the Attached Documents tab of the process.
Final Billing Notification
“We have initiated the close out process for «Project_Name» («ProjectCustom_ProjectNumber»). If you have an open commitment for this project, please submit final invoicing within 45 days of the date of this notice. If we have not received such invoice in this time period we will consider your commitment closed and paid in full.
If you have questions about this correspondence, please contact «ProjectCustom_ProjectManager» or project controls (projectcontrol@neu.edu) for assistance.
Northeastern University Project Controls”
----------------------------------------------------------------------------------------------------------------------------------
The process will also send an email notification to the process initiator with the Client Survey Letter as an attachment. The Client Survey Letter is also saved to the Attached Documents tab in the process.
Client Survey Letter

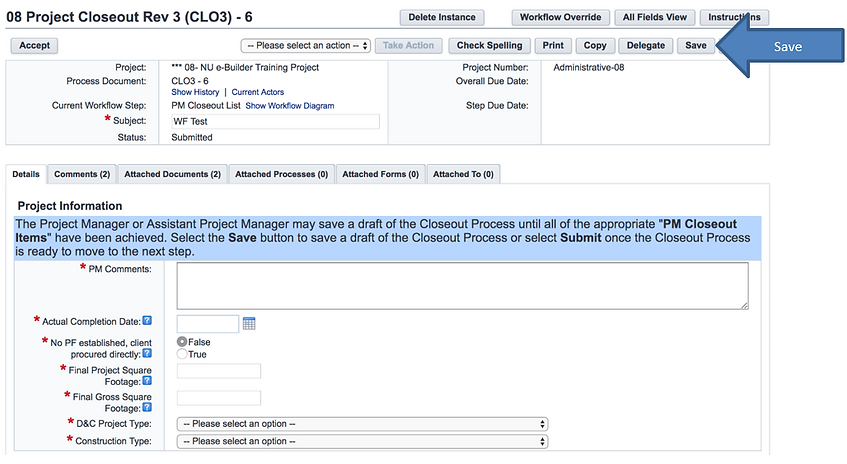
The Process is now in the “PM Closeout List” step, and can remain in this step to complete the appropriate checklist items. You can edit the fields in this step and click on Save until you are ready to submit for review to close the project and the plant fund in Banner.
Please note the helpful messages in BLUE as you proceed.
Note: All * fields are required.
In the Details tab, Project Information section enter:
*PM Comments: Enter comments for the project closeout.
*Actual Completion Date: Select the date that the project was completed.
*No PF established, client procured directly: Select “False” if a PF exists on your project (true for most projects). Select “True” if no PF was established, and the client procured directly.
*Final Project Square Footage: Enter the final net square footage (enter 0 if N/A).
*Final Gross Square Footage: Enter the gross to building square footage (enter 0 if N/A).
*D&C Project Type: Select from the drop down menu the Final D&C Project Type.
*Construction Type: Select from the drop down menu the Final Project Construction Type.

Note: All * fields are required.
In the Details tab, Funding section enter:
*Do funds need to be returned?: Select “Yes” if your project budget has a remaining balance that needs to be returned to the client. If you are not returning any funds select “No”.
Amount to be returned?: Enter the dollar amount of funds that are to be returned.
Funding Notes: Include any appropriate notes regarding funding or funding source.

Note: All * fields are required.
In the Details tab, PM Closeout Items section:
Review the (22) PM Closeout Items and mark them as “Complete”, “Not Complete”, or “N/A”. Keep in mind you can keep the process in this step and continue to save it as you work on completing these closeout items.

If applicable, complete the above evaluations. These can be completed by selecting the appropriate process(es) and completing them separately.
The Client Satisfaction Survey will be completed by Christine Jones, Project Delivery Coordinator.
For the A/E and GC/CM Evaluations, you will need to go back to the Processes Module to begin the evaluations.

Note: The Consultant Evaluation will be used as an example in this document; you will follow the same steps to do the GC/CM Evaluation.

In the Details tab, Section I – Project Information
*What Role are you in?: Select your role for the project from the drop down menu.
*Vendor To Evaluate: Click [Lookup] to search for the company you are evaluating.
Evaluation For: Select “Prime Architect” or “Sub Consultant” from the drop down menu.
Short Scope statement: Enter brief scope of work for the vendor you are evaluating.

In each of the ten categories, score each of the questions appropriately and add any additional comments you feel necessary.
-
Administration
-
Management of Consultants
-
Evaluation of PCO’s-Change Orders
-
Problem Resolution
-
Quality of Contact Documents
-
Communication Skills
-
Project Support
-
Adherence to project budget limitations
-
Ability to Manage Regulatory/Approvals
-
Quality

Summary and Certification: Add any additional comments and select your name from the drop down menu for your role on the project to certify the information in the evaluation. Lastly, enter the certification date.
You can attach any supporting documentation that is appropriate at any time during the process before submitting.
To Attach supporting documentation, select the "Attached Documents" tab. Click “Attach”. This will open the Attach Documents Window.


NOTE: If the Destination folder does not auto-populate; browse to:
Documents\00 Financials and Contracts\06 Audits\01 Internal in the Document Structure.
Note: You can browse for a file from your computer or from the e-Builder document structure module from the project in which you are in.

Click "Attach Selected" at the bottom of the screen.
You can also drag and drop a file or multiple files to upload to the process. You must select a destination folder and click “Finish” to complete the upload.
Click on the "Submit" to move the process forward and complete the evaluation. When the evaluation process is finished, mark it as “Complete” in the Project Closeout process.

Note: All * fields are required.
In the Details tab, Project Closeout Deliverables section enter:
Review the Project Closeout Deliverables checklist and mark them as “Submitted” or “N/A”. Keep in mind you can keep the process in this step and continue to save it as you work on receiving these items.

Reconcile the project budget in the Budget Change Items section of the process.
Once all of your commitments have been closed out, budget has been reconciled, all of the appropriate PM Closeout Items have been completed, evaluations are completed, and Project Closeout Deliverables are received…
Click on the "Submit" to move the Project Closeout process forward.
Once you select Submit, the Project Closeout process is received, the process proceeds.
You are done!
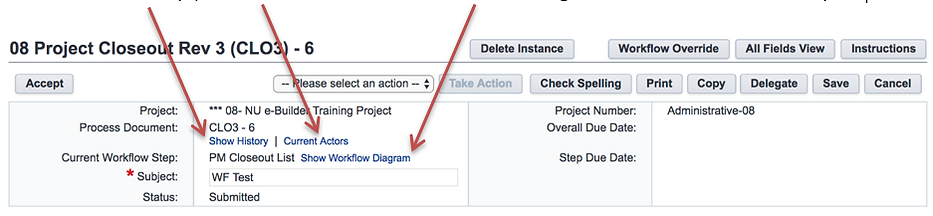
Note: Throughout this process, once it has been Submitted, you may check on the status of the Project Closeout Process by selecting, “Show History” or “Show Workflow Diagram” on the process to see the next step in the approval process.
Select “Show History”, “Current Actor” or “Show Workflow Diagram” and that window will open.